Click here for a list of our Beyond Divinity Elite Hardcore Strategy Guide posts.
We recommend you buy Beyond Divinity from Good Old Games (GOG) as you can get more prompt support. Also, it is an older game, and GOG offers a risk-free money-back guarantee.
Act 1
 Skeleton Mage at Illusory Door
Citadel Levels
After quests are finished, take off your armour and kill everyone. Often if you have already spoken with someone, changing armour right in front of them won't turn them hostile. Exit to the Battlefield and come back without the Citadel Guard Armor disguise on the Hero, or move away and then back again.
Some Guards also won't become hostile until triggered by an event, such as their superior officer noticing the Hero and ordering an attack.
Deathknight Patrols
If you exploited the Battlefields, when you first enter the Citadel Levels you should be able to defeat the Deathknights one at a time without potions. Otherwise you will probably be level 7 but close to level 8, and rather short on Mana and weapon damage. In such a case, instead of tediously killing them with attrition tactics, go get your weapon improved and come back later. Either way, there are various tactics you can employ:
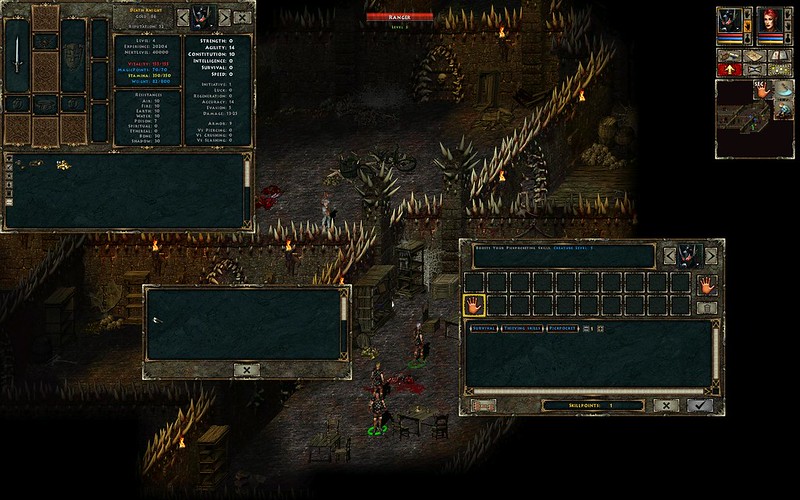
 Weapon Officer - Identify
The Weapon Officer (Guide page 54) teaches Identify (both Equipment and Monster) to level 5.
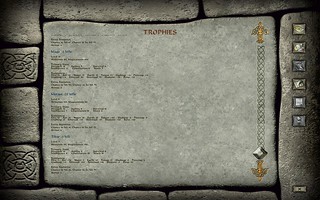
Identify Monster is really only useful if you are stuck trying to determine how to damage a particular creature. After killing at least one of a creature you get an entry under "Trophies". This entry does not include damage, and many of the stats differ from what you get from Identify Monster -- it's therefore hard to tell which is correct, and in any case generally not important. In the unlikely case you are particularly stuck about how to kill the first specimen of one type of creature, learn the skill and unlearn it later.
In the pictures on the right, you can see the difference between the stats provided by the skill and stats provided under Trophies.
Parcours
Before finishing the Parcours in the Drill Grounds (Guide page 58), check first to make sure none of the guards have accidentally wandered in, since the Parcours will be closed afterwards and you won't be able to kill any guards inside.
Barracks - Bribing Guards
Past Rashax's quarters is another "papers please" checkpoint (Guide page 65). Strangely, you can still choose the bribery option and get XP for it even with 0 gold in your inventory. The encounter plays out normally.
Samuel
However you deal with Kegan (Guide page 65) outside General Bram's Room (including not dealing with him at all), Samuel will not change his mention of it when you meet him. You go back to Kegan after speaking with Samuel and nothing will have changed.
We recommend you buy Beyond Divinity from Good Old Games (GOG) as you can get more prompt support. Also, it is an older game, and GOG offers a risk-free money-back guarantee.
Act 1
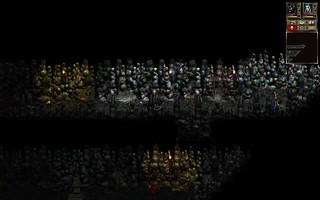
- Because many enemies level up with you (see our post on Battlefields) so there's virtually no chance you'll be unable to get XP from them, there is no point in struggling with very hard encounters early in the Act. Instead, come back later.
- Using the Battlefields but without using Wisdom, we exited Act 1 at Level 14 without using the Wisdom skill.
- Without Battlefields, but having killed all the Rats, we were level 11.
Character Development
If you want to play with magic and are willing to devote Skill Points to it, 5 ranks in [Wizard > Elemental Attack > Focused] can make for some handy sniping against archers and Skeleton Mages. If you are exploiting the Battlefields, you can often one-shot all the shooters there with rank 5 magic.
Once we reach Act 2, however, we will quickly switch it out powerful [Wizard > Shaman Magic].
There is no need to use [Focused > Instant] with lower damage rather than [Focused > Missile] since typically you will be using all ranged attacks while Sneaking, so time isn't often an issue.
Rats
After being hit initially they flee, then come back. If you are in melee you often end up chasing them into other enemies, or while chasing are hit by other enemies. So just wait and they will come back.
Water
"Mugs of Water" and "Bottles of Water" act like Health Potions, but heal only 10 Health each. Also, there is a limit to how much you can drink before you are "full". They do not act like Food and cannot let you camp/sleep.
 Fergus
Fergus
Unless you start killing Rats as well, you will not get to Level 3 before you confront Fergus.
- By killing Rats you can get ahead now, but by the time you reach the Citadel levels, you will still probably only be level 7, but closer to level 8 than if you didn't kill any Rats.
- What one extra level can get you is +5 Agility for both the Hero and the Deathknight, for more reliable hitting. This is a significant advantage!
- Also, if you can get to level 3, and if you chose Wizard/Wizard, the Deathknight will also have access to [Wizard > Body Magic > Defensive > Healing].
- You can also use the Difficulty-change exploit and start at Very Easy Difficulty for 2 Skill Points for each of the Hero and the Death Knight at the start of the game, then change the Game Difficulty to Hardcore (or whatever you like). You will retain those Skill Points.
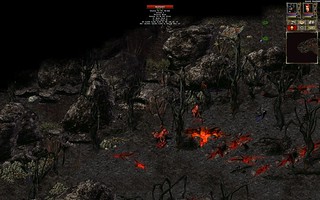
- Whether you kill Rats or not, you should still be able to defeat Fergus, possibly without having to use any potions at all. In the pictures on the right, we show before-and-after of killing Fergus -- Hardcore Difficulty, level 2 (did not kill any Rats), and we reached level 3 on killing Fergus.
Against Fergus, you can maximize your chances of survival by doing the following:
- Make sure the portcullis separating the Cell Block and the Torture Rooms is open.
- After the cutscene with Fergus, flee. Make sure he is following closely and lead him to the hole that exited from the Flight Tunnel into the storage room (Guide page 26, location 1).
- Go through the Flight Tunnel and out into the Cell Block. Go back to the Torture Rooms and Sneak past Fergus if necessary -- don't alert him yet.
- Grab the Hunter's Knife from the room in which you found Fergus talking to Plox; this will be your best weapon for a long time. Trigger the painting to open the secret Shrine.
- Position the character who does NOT have the Poison skill in the Shrine.
- Have the character with Poison hit Fergus, then run to the Shrine where you will fight him.
- Fergus will attack one person at a time. Positioning one character behind Fergus seems to help with hitting him.
- When Fergus's target is dangerously injured, retreat that character and try to get Fergus to engage the other one. You can try running out of the room and around a corner. Once Fergus is attacking the other character, he won't switch targets. Bring the injured character back and keep attacking.
- When both characters are low on Mana, touch the Mana Shrine in the Shrine Room to restore party Mana to full. Do this especially if you have the Healing spell. Obviously, use the Shrines first instead of your potion resources.
- Fergus will heal himself during the fight. He will do so again when his Mana eventually recovers enough for him to cast his spell again, so you can't really leave this fight unless you want to start all over.
With Level 3 characters and 1 character with 1 level of Poison, I killed Fergus using no Shrines and no potions.
Archers
In the Battlefield as well as in the rest of the main game, there will be "archers". These can be Skeletons with bows, Skeletons that throw knives (but drop arrows when they die) or Flying Eyes that shoot fire arrows. Typically they drop a quiver of 20 arrows, minus whatever they used.
Therefore, it is to your advantage to kill them without their firing a single shot.
You can do it in various ways:
Sneak
- One level of Sneak in Act 1 will reduce their sight radius enough that if you go straight for them while Sneaking, they will put away their bow and engage you in melee because you are too close.
Bow or Magic
- You can Sneak out of their sight range and shoot them. If you are using [Wizard > Elemental Attack], that can go through walls and you can blindly fire into the fog of war instead of on a creature (which will cause it to home in on that creature and unerringly hit). If you are using [Wizard > Elemental Attack > Focused > Missile], it will hit the first enemy it encounters.
- At level 5, [Wizard > Elemental Magic > Focused > Missile] can sometimes 1-shot most archers in Act 1. If you did not exploit the Battlefield, then Skill Points will be much tighter and you may have to just use a bow if you don't want to wait forever for your Mana to regenerate.
- Wait at a corner or doorway (preferably with the door closed), then wait for them to walk into you, or charge out and kill them when they are close (before they switch to their ranged weapon and fire).
Sneak and Rush (Very tricky to do)
- If you have no levels in Sneak, then at the very edge of their sight radius, rush them: Pause the game, click them as the target, right-click to turn off Sneaking, then unpause the game. If you can rush them in a straight line (and preferably if their back was turned to you), you should be able to get there just before they fire. They will instead switch to melee.
- You will probably be around level 4 when you first encounter them in the Arena Cells, and they will be level 5 or 6 and hit really hard with Spiritual attacks.
- Either leave them for later in the game or release them and use Sneaking to isolate one at a time. They hit very hard and are very resistant to all [Wizard > Elemental Magic].
- You can melee them if you have Agility of around 20+, but it is still sometimes chancy. Nevertheless, it is generally possible to clear them all before proceeding down the pit in the Arena (and without farming for levels in the Battlefield).
- Sometimes if you exit the game and load a saved game, a duplicate monster appears. This has been noticed at the Arena Cells where on Hardcore there are two Ghosts.
- You can kill one, save, then reload and there will be two ghosts again. This is probably related to Hardcore mode typically having two times as many enemies (except those that have dialogue). It may possibly depend on which of the two ghosts in a cell you kill.
- If you get in trouble, you can try luring them into one of the lever-locked rooms and then dashing out and locking them inside.
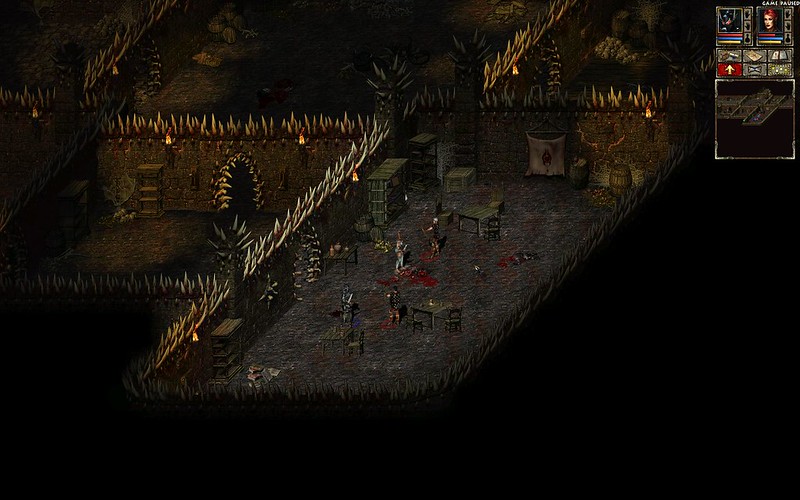
Arena Guard
The second Arena Guard ("I never saw prisoners so eager to enter the fighting arena before.") will be attacked by his allies behind if they spot him and you don't kill him first. Hmm...
Rooms Controlled by Lever
Some doors are closed and locked by levers. You can use this to isolate enemies and dispatch them without having other (especially archers) wandering out of the room.
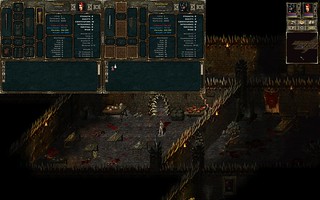
In the picture below, we positioned the Deathknight at the lever while the Hero pulled one Guard out of the room. As soon as the guard was through the door, we hit the lever with the Deathknight, locking the rest in the room until we could deal with the single Guard.
Something else interesting you can do at this room (and elsewhere) is to spot the archers before they are hostile, and Pickpocket their melee weapons from them (see below). You cannot steal anything currently equipped, nor can you steal from creatures already turned hostile.
You can decide whether this is "magical Pickpocketing" and the Survivor's advantage in exchange for spending Skill Points; or a cheesy exploit.
Once they are hostile, they use their already equipped bows first. If you reach them in melee, they have no melee weapon to switch to, and simply freeze -- they don't flee, and neither do they fire their bows (see below).
Summoning Doll - Skeleton
The second Arena Guard ("I never saw prisoners so eager to enter the fighting arena before.") will be attacked by his allies behind if they spot him and you don't kill him first. Hmm...
Some doors are closed and locked by levers. You can use this to isolate enemies and dispatch them without having other (especially archers) wandering out of the room.
In the picture below, we positioned the Deathknight at the lever while the Hero pulled one Guard out of the room. As soon as the guard was through the door, we hit the lever with the Deathknight, locking the rest in the room until we could deal with the single Guard.
Something else interesting you can do at this room (and elsewhere) is to spot the archers before they are hostile, and Pickpocket their melee weapons from them (see below). You cannot steal anything currently equipped, nor can you steal from creatures already turned hostile.
You can decide whether this is "magical Pickpocketing" and the Survivor's advantage in exchange for spending Skill Points; or a cheesy exploit.
Once they are hostile, they use their already equipped bows first. If you reach them in melee, they have no melee weapon to switch to, and simply freeze -- they don't flee, and neither do they fire their bows (see below).
Summoning Doll - Skeleton
- Be very careful about your skill choice because you get no Skill Points back when you Unlearn a skill.
- Don't develop the Skeleton yet. It is basically good as a pack mule and nothing else. More than likely it will just slow you down with micromanagement.
- When summoned, it remembers whether it was previously Sneaking. This is separate from whether the party is currently Sneaking or not.
- Therefore, if you are Sneaking and summon the Skeleton, it may not be Sneaking and will immediately give away its location, possibly pulling enemies to you because it is summoned right beside you.
- You can therefore also send a non-Sneaking skeleton off to draw away the enemy while you are yourself Sneaking.
- When you are fighting a lot of weak opponents, you can set your characters to Aggressive so they automatically engage nearby hostiles. However, the currently selected character (party leader -- you always have one) is always under manual control. You can get around this by summoning the weak Skeleton which you probably don't want to run around and fight, then select it as the party leader. Set the Hero and the Death Knight to Aggressive, and let them run around. They can go far away from a Summoning Doll without causing it to vanish.
Taxlehix
- When Tax asks to play a game, you can press "X" to cancel. This leaves him in the level as a merchant instead of letting him disappear. You can talk to him any time later to "play his game" by choosing the appropriate dialog option, and get the XP for it.
- Tax can teach [Survivor > Thieving Skills] to level 10, which is the highest level in the main game. We discussed Sneak, Pickpocket, and Poison in our Character Generation guide. You can get Lockpicking cheaply now, but you can safely delay getting the skill, if at all. The problem is the ludicrous Skill Point: Reward ratio. Just the cost of unlearning this skill will probably put you in a deficit considering what you got from the barrels and occasional chest. If you want good loot, just use Pickpocket on merchants.
These are irritating. You can treat them like Archers except they flee when you are close.
- With 1 level of Sneak, they will flee as soon as you are in their sight radius; this also causes them to lose sight of you, so they just yo-yo back and forth that way. This effectively keeps them from attacking you, although if they finally run out of Stamina and stop running, they may wander in for melee or to cast spells.
- I used bows against them in order to short-cut waiting for Mana to regenerate since I wasn't aggressively developing Intelligence yet. This is probably the fastest way to kill them especially when they are clumped, since an arrow will hit the first enemy that it encounters so you can select one of the ones in the rear and hit others in between with stray shots.
- Do NOT chase them with melee if you are using a bow or crossbow, since that can cause them to run out of the way of your arrow, making you automatically miss.
- Guide page 48 describes a way to basically exhaust their Stamina then close for melee. However, that can sometimes backfire since they are strong in melee with Spiritual weapons that can hit harder than their spells.
Skeleton Mage at Illusory Door
(Guide page 43)
 Dead Imp
Northwest of the teleport trap destination (Guide page 41, map location #10) is an inaccessible dead imp (see picture on the right). If you hover your mouse around that location and beyond, there are other items. E-mail me if you know how to reach them.
Barrels of Poison
- The spike traps along the route are probably the first you will encounter. They actually deal damage over time, so if you run out of the area you will take less damage.
- After defeating the skeleton, a chest will appear near where the illusory door had been. This chest apparently always gives an enchanted item and is therefore great to exploit with the save-game-before-mousing-over-the-container trick. Loot is not generated until you mouse-over a container.
Dead ImpNorthwest of the teleport trap destination (Guide page 41, map location #10) is an inaccessible dead imp (see picture on the right). If you hover your mouse around that location and beyond, there are other items. E-mail me if you know how to reach them.
Barrels of Poison
In the Poison Gas Room (Guide page 43), there are two barrels of Poison near the entrance. You can put them in inventory. But if you place them on the floor, the poison is released near them for fast poison damage. You can therefore use these as grenades, albeit heavy ones to lug around. More in Act 2 in the Imp Village.
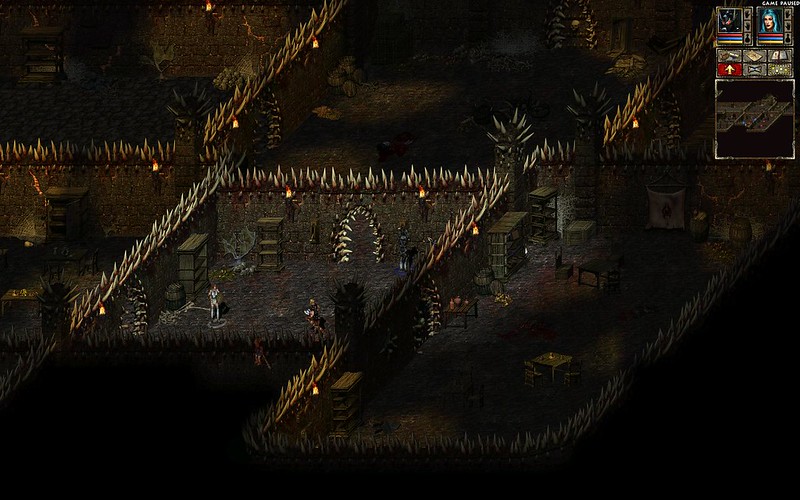
Citadel Levels
After quests are finished, take off your armour and kill everyone. Often if you have already spoken with someone, changing armour right in front of them won't turn them hostile. Exit to the Battlefield and come back without the Citadel Guard Armor disguise on the Hero, or move away and then back again.
Some Guards also won't become hostile until triggered by an event, such as their superior officer noticing the Hero and ordering an attack.
Deathknight Patrols
If you exploited the Battlefields, when you first enter the Citadel Levels you should be able to defeat the Deathknights one at a time without potions. Otherwise you will probably be level 7 but close to level 8, and rather short on Mana and weapon damage. In such a case, instead of tediously killing them with attrition tactics, go get your weapon improved and come back later. Either way, there are various tactics you can employ:
- Fight-and-Heal
- Fastest but riskiest. Make sure your weapon damage is high, around 80+ or you might not get through their armour. Either one character has a good weapon and the other has a deep Mana pool to Heal several times, or both have good weapons and both have moderate to deep Mana pools (be able to cast Heal at least twice one shortly after the other). If your Agility is high (25+) you should be able to hit reliably for this to work.
- If you followed our Character Generation suggestions, at least one character is a high-Agility warrior. You can quickly get a significant damage boost for your Hunter's Knife (yes, that weapon from Fergus's room is likely still your best weapon for a high-Agility character) with the [Warrior > Craftsmanship > Sharpen Weapon] skill either from the Weapons Officer on this level (Guide page 54), or the Battlefield merchant if you are exploiting the Battlefield. Once you have a damage rating of about 100 the Deathknights should fall quite easily, although a Healing spell or two will probably be necessary.
- If you skipped developing Strength, the Hero should have points for high Agility (which also contributes to damage) as well as good Intelligence for a decent Mana pool.
- Remember that Healing spells work over time, so if you are under attack you can cast it when your health bar isn't completely empty and the healing will offset incoming damage.
- Basically you are using the same tactics as you used against Fergus except the Deathknights are more inclined to change targets, making it a bit easier to handle when you need to switch who is coming under attack.
- If you run out of Mana and Health, run and Sneak to hide. Wait for your Mana to come back, then Heal, and possibly wait some more before finishing off the Deathknight.
- Snipe
- Stay out of sight with Sneak and shoot.
- This can take a long time if your bow or crossbow damage is low. And it costs a lot of arrows. There is also a lot of micromanaging to stay hidden.
- Snipe with Magic
- Same as with Sniping (above) but more reliable since magic always hits. Depending on your Mana pool and skill level, this can take a while but Health Regeneration is slower than Mana regeneration so with a deep enough Mana pool on both characters you should be able to kill a Deathknight Patrol safely.
- A Wizard build favouring Intelligence first over Agility can therefore be better against this particular challenge.
Weapon Officer - IdentifyThe Weapon Officer (Guide page 54) teaches Identify (both Equipment and Monster) to level 5.
Identify Monster is really only useful if you are stuck trying to determine how to damage a particular creature. After killing at least one of a creature you get an entry under "Trophies". This entry does not include damage, and many of the stats differ from what you get from Identify Monster -- it's therefore hard to tell which is correct, and in any case generally not important. In the unlikely case you are particularly stuck about how to kill the first specimen of one type of creature, learn the skill and unlearn it later.
In the pictures on the right, you can see the difference between the stats provided by the skill and stats provided under Trophies.
Parcours
Before finishing the Parcours in the Drill Grounds (Guide page 58), check first to make sure none of the guards have accidentally wandered in, since the Parcours will be closed afterwards and you won't be able to kill any guards inside.
Barracks - Bribing Guards
Past Rashax's quarters is another "papers please" checkpoint (Guide page 65). Strangely, you can still choose the bribery option and get XP for it even with 0 gold in your inventory. The encounter plays out normally.
Samuel
However you deal with Kegan (Guide page 65) outside General Bram's Room (including not dealing with him at all), Samuel will not change his mention of it when you meet him. You go back to Kegan after speaking with Samuel and nothing will have changed.
Comments
Post a Comment