Star Wars: Empire at War - Rebellion Space Units
This is a hint / guide for Star Wars: Empire at War. The index of all our guides for Empire at War is here.
I like to run space battles with no unit losses (unless they are "free" units that are from, for example, space station garrisons), so you won't see tips like "keep calling for reinforcements".
My early fleet consisted of Sundered Heart (for anti-Fighter support), six Nebulon-B frigates, two Marauder corvettes, and one Fleet Commander. Sometimes this will work out to 23 points because the game doesn't always count Sundered Heart (heroes normally don't count toward the point total). The Nebulon-Bs are changed to Assault Frigates later, and when Raymus Antilles is removed from the game, Sundered Heart is swapped for a regular Corellian Corvette.
I kept the Corellian Corvette against TIE Bombers, and for the most part they survive alright. In the late game when you can build Mon Calamari capital ships, I took a chance and changed my fleet to five Mon Calamari Star Cruisers, two Marauders (who have to do double-duty as anti-fighter support after a battle), and one Fleet Commander. It works out not too badly.
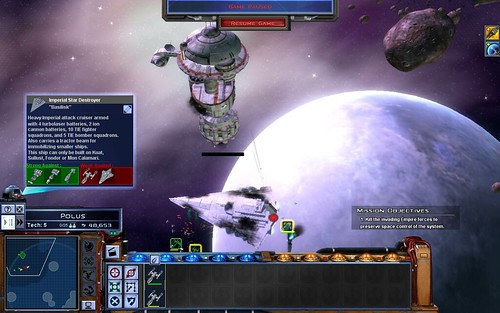
I did not use fighters at all if possible because in larger battles they are hard to manage and it is easy to lose a few wings. A few losses are probably okay for the potential firepower of the Y-Wings, but my goal was to win without losses of units I bring into combat, either in Space or on Land. That said, check out this screenshot (played on Hard difficulty) where an Alliance space station, at just level 1 and with no support other than the garrison from its hangars defeats a lone Imperial Star Destroyer attacking the system, with considerable help from the Ion Cannon Blasts of the Y-Wings.
Z-95 Headhunter
I did not use this unit at all, as the shielded Corellian Corvette provides a lot of anti-fighter firepower combined with better staying power.
Corellian Corvette (CR90 Corvette)
- If you set them to target a unit, they sit still, making them easier targets. Try to keep them moving as they are small and hard to hit. A large gang of them has a lot of firepower to whittle down shields of larger enemy ships, but they can be vulnerable to the concentrated fire of Tartans if you're not paying attention. The AI tends to send them one at a time, however.
- You can easily have a large number of them and they can perform admirably, but if you try to move them all at once, they tend to fan out in a long row -- And while maneuvering into that row, some of them often forget the Move command and end up drifting off to attack something. Even if they don't, this formation tends to cause the ones moving to the edge positions to have to go around asteroid fields and nebulae and inadvertently get the attention of the enemy.
BTL Y-Wing Starfighter
This is a fragile unit in a space battle and has to be carefully protected in order to bring their Ion Cannon Blast to bear. You need a lot of them to disable a large ship in the first volley -- very useful if you can manage it, but the difficulty in setting it up, and for just one target, makes this power not worth the effort. It takes several shots to affect even a Tartan this way. This unit is generally superseded by either the Corellian Gunship or the Marauder-class Corvette.
T-65 X-Wing Starfighter
I did not use this unit at all, as the shielded Corellian Corvette provides a lot of anti-fighter firepower combined with better staying power.
Corellian Gunship (DP20 Frigate)
- In the Rebellion campaign, you must steal this technology from the Imperials at Tech Level 2.
- The missiles ignore shields, and so are very good for taking out specific hardpoints, such as Shield Generators or Hangars. A gang of them are required to do this quickly, however, and that in turn takes up many points from your 25-point space combat limit.
- They are good against anything smaller than a Frigate only at close range, and only because the slow missiles are rapidly fired in a volley and have a limited tracking ability -- don't count on them to help you clear fighters or even Tartans.
Marauder-Class Corvette
In the Rebellion campaign, you must steal this technology from the Imperials at Tech Level 2.
This unit works more or less like an Imperial Broadside Cruiser, except it is smaller and more maneuverable, though not by much.
EF76 Nebulon-B Escort Frigate
- In the Rebellion campaign, you must steal this technology from the Imperials at Tech Level 2.
- Although you can get interesting Corvettes, this will be your main space fighting force in the early game because of their staying power and overall firepower. A gang of them is agile and fast enough to quickly descend on one of the slower Imperial cruisers and take it out -- or flee if they can't do it quickly enough. In contrast, an Acclamator or Victory Star Destroyer has very slow, wide, turns and needs other ships to successfully draw fire while it retreats.
- The Boost Shield Power ability only works if the shields haven't been completely depleted. If they have, you will have to wait until some of your shield regenerates.
- Although they are quite small, they still can't go through an asteroid field without damage. Listen for the captain to say "our shields won't protect us from the asteroid field" to know that your Move command will take at least one inside. You can still theoretically go through, but keep your shields up.
Assault Frigate Mark II
- In the Rebellion campaign, you must steal this technology from the Imperials at Tech Level 3.
- Even six of these take a very long time to take down a single Imperial Star Destroyer. A good strategy is to send them forward and target the Engines, as they like to charge at your Marauders. By disabling engines, you let your Marauders keep firing missiles, which are practically necessary to take one down in a reasonable amount of time.
- Against two Imperial Star Destroyers, you will probably have to somehow separate them.
- Watch for very wide and stupid turns.
- The Boost Shield Power ability only works if the shields haven't been completely depleted. If they have, you will have to wait until some of your shield regenerates.
Mon Calamari Cruiser (MC80 Liberty type Star Cruiser)
- You get this technology after Mission 10 (Handle with Care!). You also get Admiral Ackbar's Home One, and four free Mon Calamari capital ships. By the time you build your own fleet, the Rebellion Campaign is practically over.
- Watch for very wide turns and very slow movement. You really need to make an early decision as to whether you want to pull one back or not.
- The Boost Shield Power ability only works if the shields haven't been completely depleted. If they have, you will have to wait until some of your shield regenerates.
RZ-1 A-Wing Interceptor
You get this technology after Mission 10 (Handle with Care!). By the time you build one, the Rebellion Campaign is practically over, so I did not try it during the campaign.
Comments
Post a Comment